
Today I have successfully deployed a virtual exchange 2010 lab environment, the impressive thing that make me write this post that I used in the test my home dynamic IP to send and receive emails (nice isn't it !!).
So I decided to write documentation for the most difficult part (which is setting DNS records and setting Send And Receive connectors).
Good to mention that I have searched the Internet for Hours to find simple steps for doing it but unfortunately I didn't found any, actually I used my experience and my understanding for how emails routing works to succeed.
Next I will give brief description of the lab and steps I used:
First: I used VMware Workstation 9 as a virtualization platform.
Important Note: at the beggining I used Network NAT Mode, it works OK but I had a problem when I wanted to forward port from my router to the Exchange server (the router cannot forward to different subnet) , so I had found a solution to change the network setting from NAT to Bridged Mode. see figure below

so after choosing this option I end up with same network for my Host and VM's which was 192.168.1.0.
Second: I have created 3 VM's, 1st is Win Server 2008 R2 Domain controller, 2nd is Win Server 2008 Exchange 2010 server, and last is Win 8 client VM (domain user with Outlook 2010) .
Third: I have converted the first Win Server 2008 server to DC with a domain name as the email suffix I wanted .
Fourth: I have Installed all Windows Updates Before installing Exchange 2010, I will not list the steps I used to install the exchange 2010 because it is every where on the net.
Fifth: Of course your dynamic IP well change every few days so I had to find workaround, and I already used before Dynamic DNS which is really great (from http://www.dyndns.com)
so what I get from this website is a Fixed DNS name pointing to my Dynamic IP, then from my Router I login to my DDNS using user name & password (my router support DDNS, if not there is another solution which is downloading DDNS client to your Ex Server and login to the service)

After you press login you should see succeed word, otherwise you check what is the problem.
Sixth: I have purchased new Domain from GoDaddy Hosting which is matching my local domain name, actually nowadays the price of domains is so cheap, it cost me only 7 U$ Per Year (Can you Imagine :)
After I sign in to domain, I logged in to the control panel of my website and all I had to do is adding new MX record , which point to my Dynamic DNS (don't forget to make the new MX record the lowest priority which authorize it for receiving emails for your domain)
Note: (Forget about adding A records or CNames it is all make you confuse :)
 There is useful website to see if your MX record was updated successfully after adding new one:
http://www.whatsmydns.net/#MX/
and amazingly the update was very very fast it took around 5 - 10 min only.
After Setting my DDNS and MX record I Forwarded port 25 (which is the default port for Mail Transfer Protocol) to my Exchange Server IP (192.168.1.11) as the below figure:

After doing this I had to test the port with the DDNS, so I had to telnet (from External network) as follow:
C:/>telnet dnsname.dyndns.info 25
and I successfully opened session with the exchange server.
So now, I have Exchange Server Installed and DNS settings configured, and my router also forwarding the incoming mail to my exchange server, then I had to create new email account and connect it to Outlook 2010, later I tried to send or receive email but with no luck (of course because I didn't make any changes on Send & Receive connectors).
So I used www.testexchangeconnectivity.com to test emails flow.
then I choose
Internet Email Tests
Inbound SMTP Email
and I inserted the email address I wanted to test and received the following error
After setting this on, I successfully received emails, but couldn't send emails, and this was the most difficult part of my Whole project.
After googling Hours and searching every where on the internet, I almost give up to use my current smtp server for sending emails, but I had the feeling that I was close to make it work, so after changing many many configuration of the Send Connector, it worked (I was Really Happy & surprised, because I am confident that no one (or few people) on the internet have done it the same way or by anyway.
anyway below is the screen shot of the send connector configurations I used:


Finish now Exchange 2010 can send and receive.
Great Isn't it.
So I decided to write documentation for the most difficult part (which is setting DNS records and setting Send And Receive connectors).
Good to mention that I have searched the Internet for Hours to find simple steps for doing it but unfortunately I didn't found any, actually I used my experience and my understanding for how emails routing works to succeed.
Next I will give brief description of the lab and steps I used:
First: I used VMware Workstation 9 as a virtualization platform.
Important Note: at the beggining I used Network NAT Mode, it works OK but I had a problem when I wanted to forward port from my router to the Exchange server (the router cannot forward to different subnet) , so I had found a solution to change the network setting from NAT to Bridged Mode. see figure below

so after choosing this option I end up with same network for my Host and VM's which was 192.168.1.0.
Second: I have created 3 VM's, 1st is Win Server 2008 R2 Domain controller, 2nd is Win Server 2008 Exchange 2010 server, and last is Win 8 client VM (domain user with Outlook 2010) .
Third: I have converted the first Win Server 2008 server to DC with a domain name as the email suffix I wanted .
Fourth: I have Installed all Windows Updates Before installing Exchange 2010, I will not list the steps I used to install the exchange 2010 because it is every where on the net.
Fifth: Of course your dynamic IP well change every few days so I had to find workaround, and I already used before Dynamic DNS which is really great (from http://www.dyndns.com)
so what I get from this website is a Fixed DNS name pointing to my Dynamic IP, then from my Router I login to my DDNS using user name & password (my router support DDNS, if not there is another solution which is downloading DDNS client to your Ex Server and login to the service)

Sixth: I have purchased new Domain from GoDaddy Hosting which is matching my local domain name, actually nowadays the price of domains is so cheap, it cost me only 7 U$ Per Year (Can you Imagine :)
After I sign in to domain, I logged in to the control panel of my website and all I had to do is adding new MX record , which point to my Dynamic DNS (don't forget to make the new MX record the lowest priority which authorize it for receiving emails for your domain)
Note: (Forget about adding A records or CNames it is all make you confuse :)

http://www.whatsmydns.net/#MX/
and amazingly the update was very very fast it took around 5 - 10 min only.
After Setting my DDNS and MX record I Forwarded port 25 (which is the default port for Mail Transfer Protocol) to my Exchange Server IP (192.168.1.11) as the below figure:

After doing this I had to test the port with the DDNS, so I had to telnet (from External network) as follow:
C:/>telnet dnsname.dyndns.info 25
and I successfully opened session with the exchange server.
So now, I have Exchange Server Installed and DNS settings configured, and my router also forwarding the incoming mail to my exchange server, then I had to create new email account and connect it to Outlook 2010, later I tried to send or receive email but with no luck (of course because I didn't make any changes on Send & Receive connectors).
So I used www.testexchangeconnectivity.com to test emails flow.
then I choose
Internet Email Tests
Inbound SMTP Email
and I inserted the email address I wanted to test and received the following error
5.7.1 Client was not authenticated
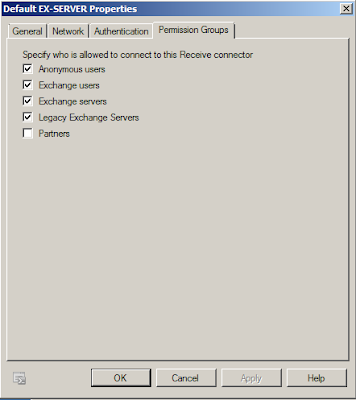
so I did littile search on Google I found the solution fast, which is to allow anonymous users setting in (Default Receive Connector)
After setting this on, I successfully received emails, but couldn't send emails, and this was the most difficult part of my Whole project.
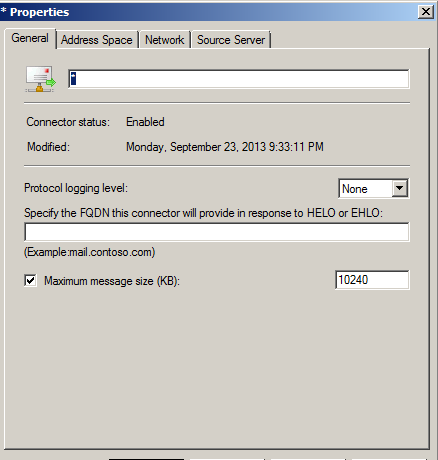
After googling Hours and searching every where on the internet, I almost give up to use my current smtp server for sending emails, but I had the feeling that I was close to make it work, so after changing many many configuration of the Send Connector, it worked (I was Really Happy & surprised, because I am confident that no one (or few people) on the internet have done it the same way or by anyway.
anyway below is the screen shot of the send connector configurations I used:


Great Isn't it.


)
5 Comments
Yassour,
ReplyDeleteI have a question when you used DDNS do you register the public ip address of your provider? Please let me know I am testing this on my Vmware as well inspired by you my friend your a genius!
Hello Natedogg, you don't need to register your public IP, just put ur DDNS user name & password in the router. And you can then try to ping your DDNS name, and it should resolve to ur public IP, hope this is informative.
ReplyDeleteYassour, thanks to your inspiration I have done it finally! am able to send and receive email I used comcast smtp rely to send message since they didn't allow me to do so directly and to receive I had to submit a ticket to unblock port 25 on their end. All working now friend thanks a million for posting this gave me a project to do and next step I want to install ISA and do like spam filtering a NAT but not any time soon lol.
ReplyDeleteThis comment has been removed by the author.
ReplyDeleteyou are welcome my friend, glad to hear that :)
ReplyDelete